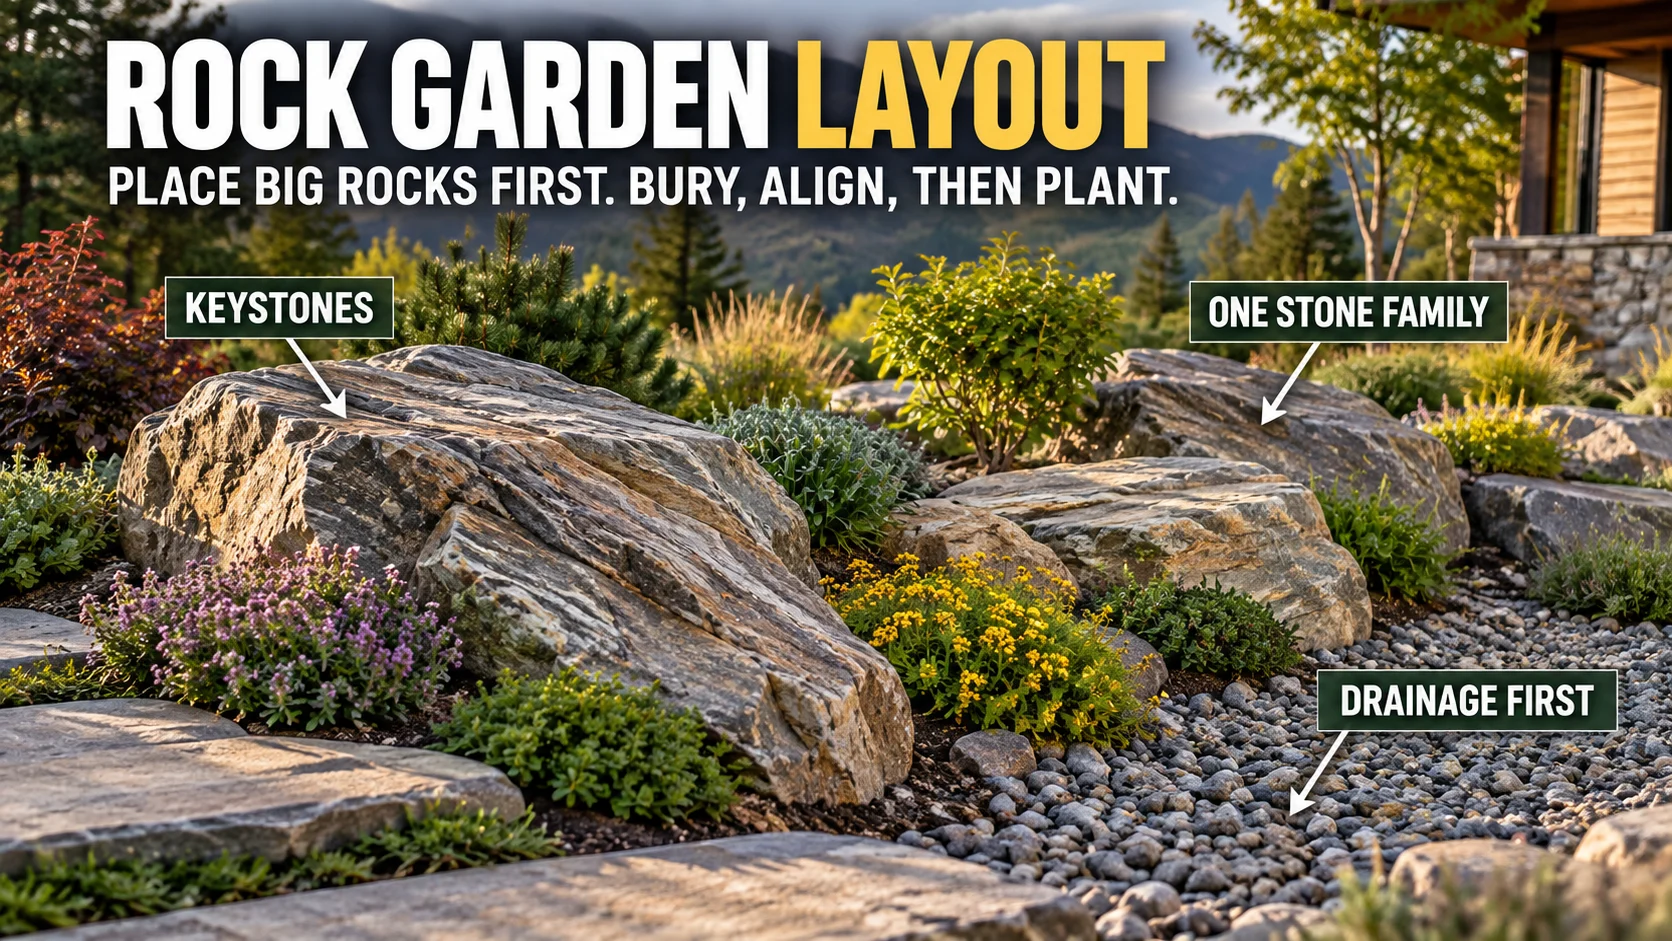

The most natural-looking rock gardens start with a few large stones placed first, partly buried, and aligned as if they belong to the same geological outcrop. Drainage and stability matter more than filling every gap, so plan the slope, water movement, viewing angle, and planting pockets before you bring in smaller stone.
What makes a rock garden look natural instead of arranged?
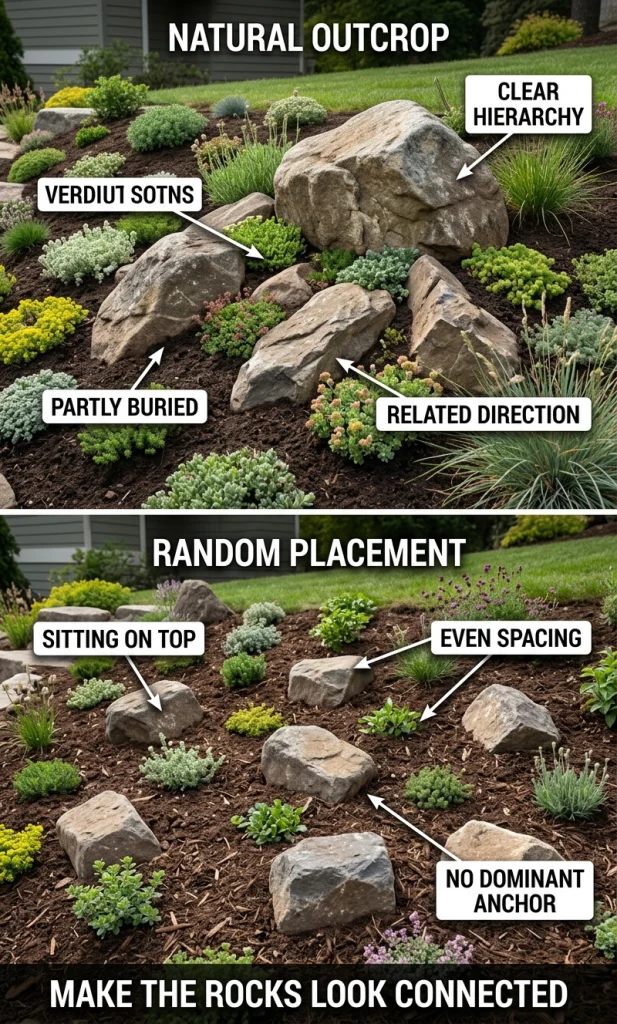
Natural rock does not usually appear as evenly spaced ornaments. It emerges in groups, with related angles, repeated material, partly hidden edges, and changes in level. The Royal Horticultural Society’s rock-gardening guidance recommends starting with large keystones, digging hollows to seat them, tilting rocks back, keeping strata running in the same direction, and burying stones up to about one-third of their depth. Colorado State University Extension similarly recommends one geological rock type, natural placement, and burying at least part of the stone rather than leaving every boulder perched on the surface.
| Layout decision | Better approach | What usually looks wrong |
|---|---|---|
| Main structure | A few dominant rocks create the framework | Many similar-size rocks scattered evenly |
| Stone family | Mostly one geological character | Unrelated colors and textures competing for attention |
| Orientation | Related faces and strata follow a believable direction | Every rock points somewhere different |
| Ground contact | Rocks are seated and partly buried | Boulders look dropped on top of mulch |
| Planting space | Irregular pockets and crevices with usable soil | Plants squeezed into leftover cracks |
Start with the site before you start with the rocks
A rock garden is partly a drainage structure and partly a planting environment. Before ordering stone, identify where water enters, where it leaves, how steep the ground is, whether there are underground services, and from which direction the garden will usually be seen. The RHS advises sketching the proposed area with the gradient, pipework, shade, and viewing position in mind before construction.
Flat ground can still support a rock garden, but the bed may need to be raised or the soil profile adjusted when drainage is slow. A natural slope can be useful because it creates level changes and lets stones read as an outcrop, yet a steep or unstable bank is a different job: if rocks are being asked to retain soil or control a serious slope, treat that as structural landscape work rather than decorative placement.
How to layout rocks step by step
- Mark the footprint and main viewing angle. Use a hose, sand, or marker line so you can judge the shape from the place where the garden will be seen most often.
- Choose the stone family before the exact rocks. One dominant stone type is easier to make coherent. Variation in size is useful; unrelated geology is harder to reconcile.
- Place the largest keystones first. These determine height, direction, and visual weight. Do not waste effort arranging small stone before the anchors are settled.
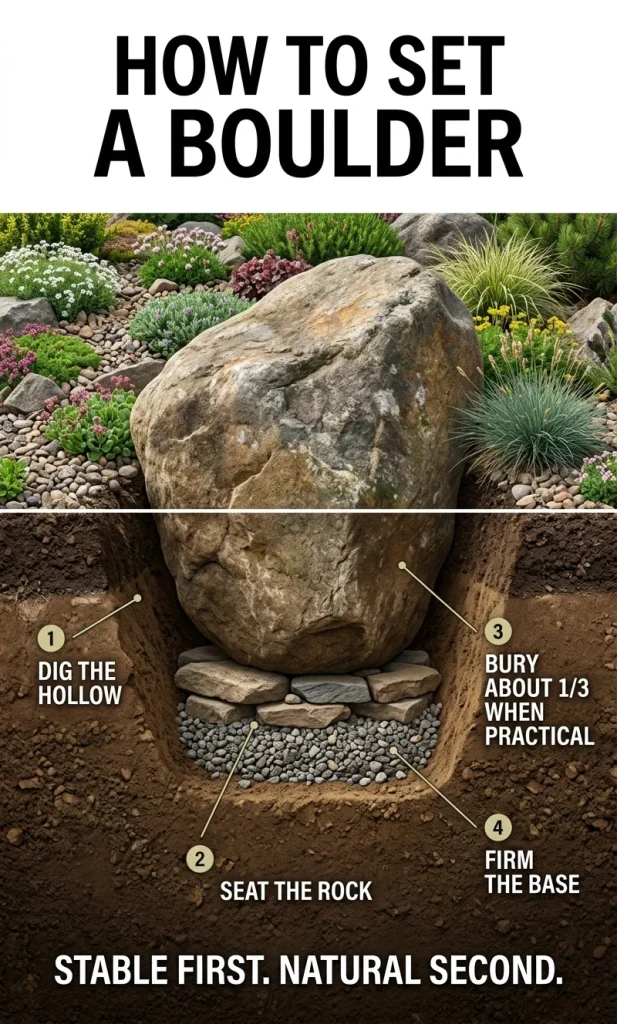
- Dig the rocks in. Excavate hollows so the boulders look connected to the ground. Where the stone shape and site allow it, burying about one-third of the depth is a widely used naturalistic rule.
- Repeat a geological direction. If the rocks have visible layers or long faces, rotate them until those lines feel related rather than random.
- Create planting pockets deliberately. Leave usable pockets at different depths and exposures instead of filling every void with gravel.
- Add secondary stone last. Smaller rocks should support the main formation, edge planting pockets, or continue a line. If a stone has no job, leave it out.
- Top-dress after planting. Gravel or grit can visually unify the bed and keep low-growing plants cleaner, but the top dressing should not hide drainage or bury plant crowns.
If you also need help choosing plants that suit these fast-draining pockets, use the site’s rock garden plants guide. The layout and the plant list should be designed together because sun exposure, soil depth, and moisture can change from one side of the same boulder to the other.
Garden design decision support
Rock Garden Layout Studio
Turn your site conditions and available stone into a practical placement sequence - without fake scoring or one-size-fits-all rock counts.
Recommended layout direction
Layered natural outcrop
The experience uses qualitative site conditions, not an invented score. Large rocks, retaining conditions, underground services and drainage changes may require competent local help.
Layout logic follows established rock-garden principles including large stones first, coherent strata direction, partial burial and drainage awareness.
Use big rocks as structure, not decoration
A common mistake is to buy a pile of medium stones because they are easier to move. The finished garden then has texture but no hierarchy. One or two visually dominant stones can do more design work than a dozen equal pieces because the eye immediately understands where the formation begins.
Set the first large stone slightly off-center from the main view, then build outward in a direction that matches the site. On a slope, that may mean following the contour or stepping the formation down the grade. In a small bed, it may mean using one keystone and one supporting rock rather than forcing a larger group into limited space. If the garden itself is compact, the site’s guide to making a small garden feel more spacious can help you preserve breathing room around the rock feature.
How deep should rocks be buried?
There is no universal depth for every boulder shape, but the practical goal is stable ground contact and a visually believable emergence from the soil. Both RHS and Colorado State University Extension describe burying roughly one-third of the rock as a useful naturalistic approach. Irregular stones may need a deeper hollow on one side or small concealed support stones beneath them so the visible face sits correctly.
Do not use the one-third guideline as permission to place very heavy boulders by hand. Mechanical lifting, safe access, ground-bearing capacity, and utility locations can matter more than aesthetics. If a rock can roll, shift, undermine a path, or act as a retaining element, the stability problem should be solved before planting begins.
How to handle drainage and planting pockets
Traditional alpine-style rock gardens are built around sharp drainage because many alpine and rock-garden plants are vulnerable to prolonged winter wet. The RHS recommends choosing a well-drained site or improving drainage, and its classic construction method uses a coarse base beneath the planting zone. That does not mean every garden needs the same sub-base; the correct build-up depends on existing soil, rainfall, slope, and what you plan to grow.
Think of each gap between rocks as a micro-site. A sunny upper pocket may dry quickly, while the shaded back of a boulder can stay cooler and retain moisture longer. The RHS notes that even a small rock garden can provide different habitats around a single stone. Use that to your advantage instead of treating the entire bed as one uniform planting condition.
Which rock layout fits your garden?
| Site condition | Layout direction | Main priority |
|---|---|---|
| Small, flat bed | One dominant outcrop with open gravel around it | Avoid overcrowding |
| Gentle natural slope | Layered outcrop stepping with the grade | Seat stones securely and manage runoff |
| Thin slabs available | Crevice-style arrangement | Consistent slab direction and suitable planting media |
| Hot, dry exposure | Open gravel garden with grouped boulders | Plant heat- and drought-tolerant species |
| Poor drainage | Raised rock bed or redesigned drainage first | Do not trap water around crowns and roots |
Three layout mistakes that make a rock garden look artificial
- Even spacing: repeating the same distance between stones creates a dotted pattern rather than an outcrop.
- Everything sitting on top: exposed bases make rocks look delivered rather than embedded.
- Too many stone types: contrasting colors, grains, and shapes can make a small garden read as a sample yard.
Another subtle mistake is adding plants before the rocks are stable. Once roots and irrigation lines occupy the gaps, moving a boulder becomes disruptive. Finish the structural arrangement first, then test the planting pockets with the plants still in their pots. That makes it easier to judge mature spread before committing.
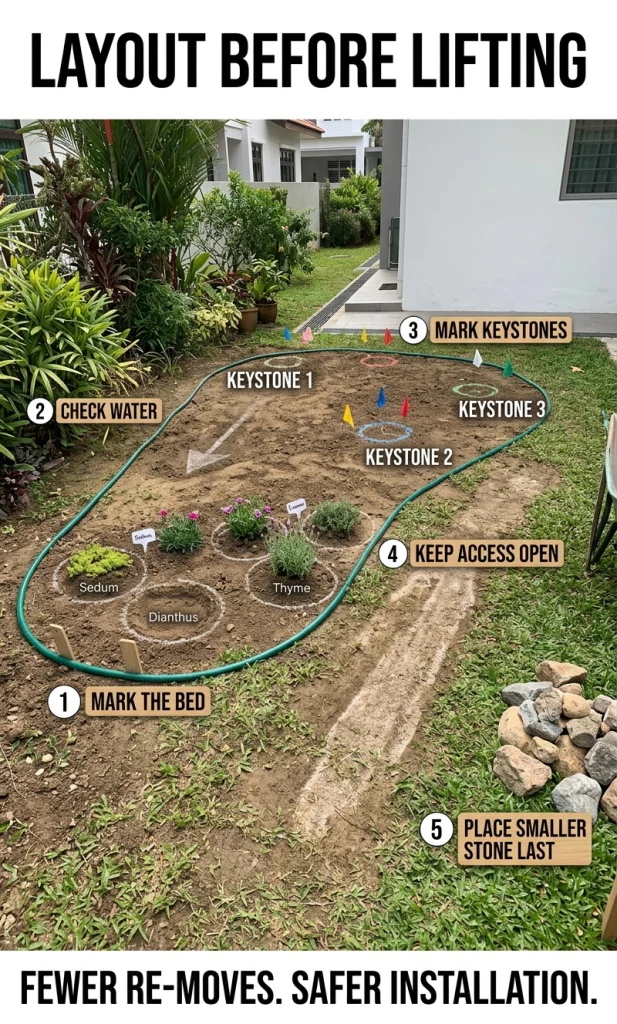
Plan the sequence before you lift anything
The safest and fastest installation is usually the one with the fewest re-moves. Mark each keystone position, decide which face should be visible, check machine or barrow access, and prepare the hollows before the stone reaches the bed. Then place the heavy pieces, confirm stability, and only after that bring in planting soil, secondary rocks, and gravel.
If you want the rock garden to connect with paths, edging, or the front approach, plan those interfaces at the same time. The site’s curb appeal landscaping guide and garden borders and edging ideas can help keep the rock feature tied to the rest of the landscape rather than looking isolated.
What about lights, herbs, or edible plants?
Lighting can work well when it grazes the face of a keystone instead of flooding the entire bed. Position wiring and sleeves before final gravel so future maintenance does not require dismantling the layout; the site’s garden rock lights guide covers that layer in more detail.
Rock gardens are not limited to alpines. In the right climate and exposure, compact herbs and other edibles can occupy well-drained pockets, but plant requirements still control the soil and moisture design. See growing herbs and edible plants in a rock garden before turning every crevice into a dry planting pocket.
Frequently asked questions
How should I arrange rocks in a rock garden?
Start with the largest keystone rocks, seat them partly into the ground, keep their visible strata or long faces running in a related direction, then add smaller supporting stones around them. Leave deliberate planting pockets and open space rather than filling every gap.
Should rocks be buried in a rock garden?
Usually, yes. Partly burying rocks improves visual integration and can improve seating. A commonly used naturalistic guideline is to bury roughly one-third of the rock where the shape, soil, and stability requirements make that appropriate.
Should all rocks face the same direction?
They do not need to be identical, but rocks with visible layers or dominant faces generally look more natural when those features follow a consistent geological direction. Random orientation is one of the fastest ways to make a designed rock garden look scattered.
How many rocks should a rock garden have?
There is no useful universal number. Use enough stone to establish a clear structure without making the bed feel packed. A small garden may need one dominant rock and a few supporting pieces; a larger slope may use several groups separated by planting and gravel.
Can I build a rock garden on flat ground?
Yes, but flat ground needs careful level changes and drainage so the rocks do not look like objects sitting on a lawn. A raised bed, shallow mound, or excavated and rebuilt profile can create a more convincing formation when the existing soil drains slowly.
Should I use one type of rock?
Using one dominant geological type usually makes a naturalistic rock garden easier to read as a single formation. You can still vary size and weathering, but mixing several unrelated stone families often creates visual noise.
Build the rock structure first, then let the planting soften it
A convincing rock garden does not need to imitate a mountain in miniature. It needs a clear structural idea: a few stones that appear to belong together, stable seating, believable direction, good drainage, and enough open soil for plants to mature. When those decisions are made first, gravel, groundcovers, alpines, herbs, and lighting become finishing layers rather than attempts to hide a weak layout.